Scheduled Updates: Sleep and Hibernate
Sleep and Hibernate are two power-saving features in Windows.
While both can prevent scheduled updates, both can be set up to allow scheduled updates.
If your computer is in sleep mode, it won't apply updates.
To set your computer to wake up for updates
- Open the Windows search box by pressing Win+S (in Windows 10 and 8) or just Win (Windows 7)
- Type Schedule Tasks in the Windows search box
- Click on Schedule Tasks
- The Task Scheduler window will open
- On the left of the Task Scheduler window, find and click on Task Scheduler Library
- On the top of the Task Scheduler Library window, find a task with the name [current year] DrakeUpdates followed by the drive letter in the Name column
- For example, the task could be named 2019DrakeUpdatesC if Drake was installed on your C drive
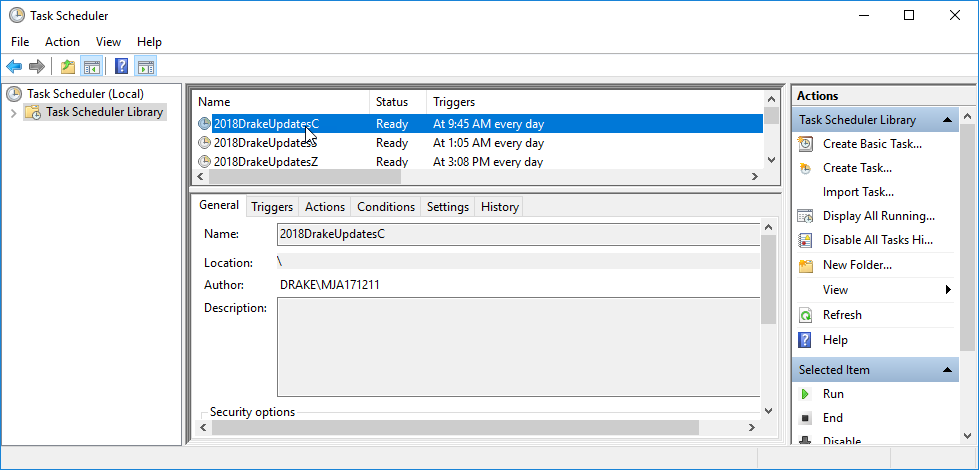
- In the Triggers column, the time for automatic updates you set up in Drake should be listed
- If the time is different than expected, click on Refresh on the right, then check the listed time
- If the time is still different than expected, you may need to verify the time entered in Drake, then click Refresh again
- Once the correct time is displayed, double-click on the task or right-click on the task and select Properties
- The Properties window will open
- Click on the Conditions tab
- Under the Power section, check the box beside Wake the computer to run this task
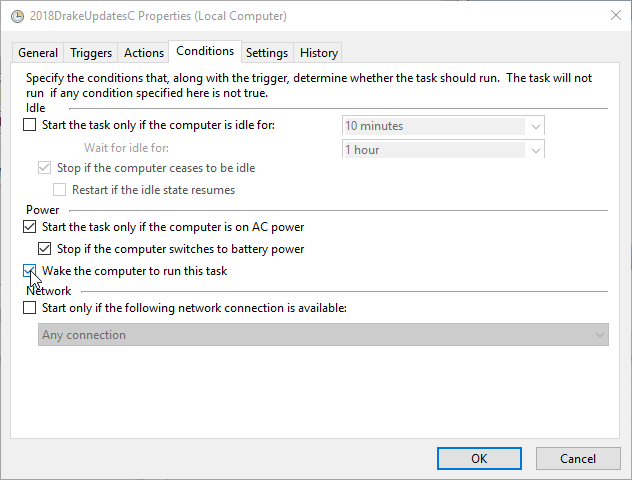
- Click OK
You can now put your computer to sleep and still receive scheduled updates.
If your computer is set up to hibernate after going to sleep, your computer may not wake up to apply scheduled updates, even after configuring the sleep settings.
To prevent your computer from hibernating
- Click the Start button (the windows logo on the left of the taskbar)
- Click the Settings icon
- Click on System
- Click Power & sleep on the left menu
- Under Related settings, click Additional power settings
- Either Balanced (recommended) or Power saver will be selected (some computers may have additional options)
- Click Change plan settings to the right of whichever plan is selected
- Click Change advanced power settings
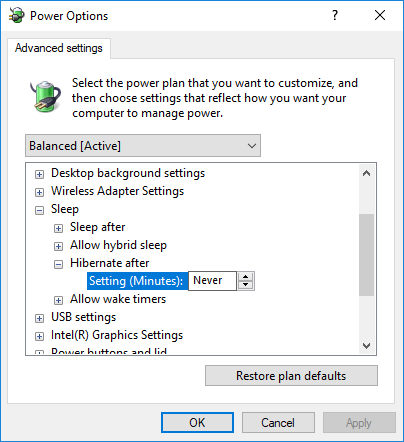
- The Power Options window will appear
- The dropdown menu near the top of the window should display the type of plan (balanced, powersaver, high performance) then [Active]
- Find Sleep in the tree below the dropdown
- Expand its contents by clicking the plus sign (+) to the left of the word Sleep
- Find Hibernate after in the contents
- Expand its contents by clicking on the plus sign (+) to the left of the words Hibernate after
- Find Setting in the contents
- Click to the right of the word Setting
- A field will appear that will allow you to adjust how long the computer sleeps before hibernating
- Select Never if that option is available
- If Never isn't an option, set the time to 0 (zero)
- While still in the Sleep tree, there may be an option called Allow wake timers
- If so, expand its contents by clicking on the plus sign (+) to the left of Allow wake timers
- Find Setting in the contents
- Click to the right of the word Setting
- A dropdown will appear that will allow you to adjust the setting
- Select Enable from the dropdown
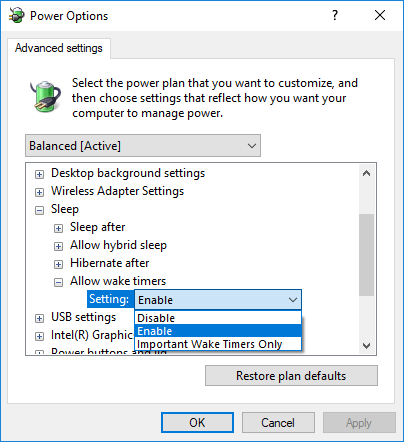
- Click OK on the Power Options window
- Close Settings
Your computer is now set up to avoid hibernation mode.
Notes
• Drake Software must be closed for Scheduled Updates to run.
• When using a network, Drake Software must be closed on all workstations and the server for Scheduled Updates to run.
• Occasionally, a user may be logged out after a Microsoft update that requires the system to restart. If that restart happens overnight and happens before the Scheduled Update, the update will not be applied.
• If the computer goes to sleep less than one minute before the scheduled update, the update may not occur.
• Drake does not need to be running and a user does not need to be logged in to Drake.
• Your computer needs to be on and a user needs to be logged into the computer.
• If your computer is not on and a user is not logged in, you will not receive scheduled updates.
• These instructions apply to Windows 10, 8, and 7. Other versions of Windows may not support these options.