Filter Manager
The Filter Manager feature allows you to customize the behavior of report filters within the application. The application uses the filter(s) to search the database and return output for a specific report.
Applying Filters
- To access the Filter Manager navigate to Reports > Report Manager. (Figure 1)
- In the Report Manager dialog you must choose to edit an existing report (Edit Report), or create a New Report. Click the button of your choice. The Report Editor opens at Step 1.
- Report Editor, Step 1 (Figure 2) – The following fields must be populated:
- Select Title and Description – Type in a "Report Title" and "Report Description."
- Select Report Columns – From the drop list choose a "Category."
- Selected report columns – These are the columns displayed in your report.
- Once you have chosen a category from the drop list, you will see the "Available Columns" for that category.
- Choose which columns you want in the report, i.e., ACA, ACA Full Year Coverage, Accounts Receivable and so on.
- Once you have completed adding columns to the "Selected report columns" list click Next.
- Report Editor, Step 2 (Figure 3) – Here you can filter your report column choices:
- Filter Selection – Select a Report filter. If none are listed you will need to create one. to create one, click Edit Filters. For more information See "Modifying Filters" below.
- Additional Report Options – See "Additional Search Options" below. Click Save. You are returned to the Report Manager.
Note
Changing an existing filter changes the output of any report that currently uses it. The software gives an alert message box the lets you know all the reports that will be impacted by your change. If you want all reports using this filter changed, select the Edit button. If you want only the report being edited to be changed, select the Copy FIlter button. If you do not want to change this filter at all, select No to return to the report editor without making changes.
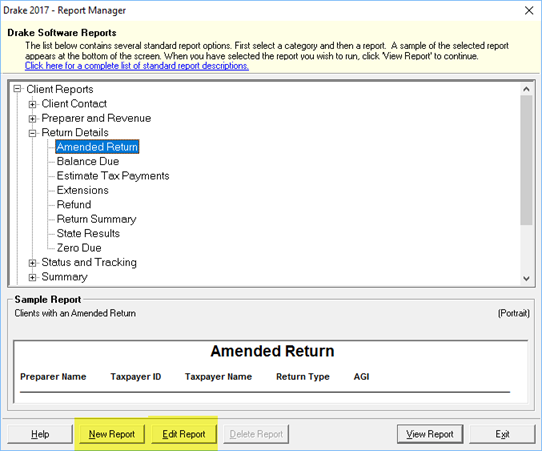
Figure 1

Figure 2
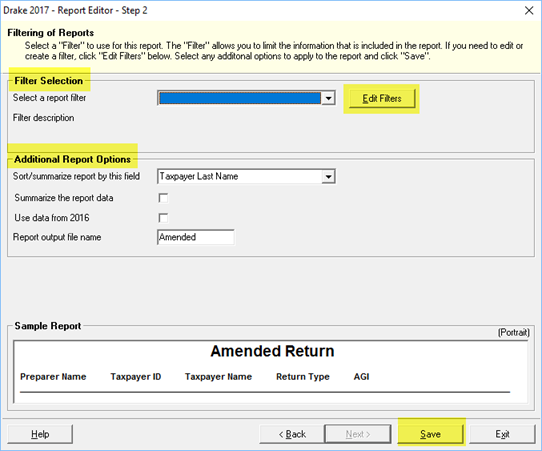
Figure 3
This area provides a list of all standard and any previously created custom filters.
Creating a New Filter
- Click New Filter.
- Enter a name in the provided text box.
- Click Ok. The new filter is now available in the Available Filters list.
Copying a Filter
This feature is used to customize an existing filter while retaining the original for future use.
- Click the filter list item you want to copy. The selected filter is highlighted.
- Click Copy Filter.
- Enter a name in the provided text box.
- Click OK. The copied filter with the new name is now available in the Available Filters list. The copy has the same conditions and settings as the original.
Renaming a Filter
This feature is used to change the name of an existing filter.
- Click the filter list item you want to rename. The selected filter is highlighted.
- Enter the new name.
- Click OK.
Additional conditions are based on a selected Keyword Name and a Comparison. The application allows up to 10 additional conditions per filter. Each keyword is a separate condition. Within this area of the screen, you can add, edit, or delete conditions.
Adding Additional Conditions
- Click Add Condition.
- Select a Keyword Name from the provided drop list.
- Select a Comparison from the provided drop list. Options available are dependent to the keyword selected. Certain conditions require additional information to be entered.
- Ask about this Condition each time the Filter is used is an option that, when selected, alerts the user when this filter is in use.
Editing Additional Conditions
- Click the condition you want to edit. The selected condition is highlighted.
- Click Edit Condition
- Make your changes.
- Click OK.
Deleting Additional Conditions
- Click the condition you want to delete. The selected condition is highlighted.
- Click DELETE.