Print Returns
Click a Topic for more information:
Print Returns is a feature that allows you to select single or multiple returns for print actions. There are two viewing preferences available in the software; the Basic and Enhanced. The Basic Viewing Preference uses the View Mode and Print Mode that has historically been a part of the software, and the Enhanced Viewing Preference uses a tree format.
Using the Basic Viewing Preference
Using the Spacebar to Select Forms
The recommended way to select and print multiple forms is the spacebar method. Navigate through the available forms using the UP ARROW ↑, DOWN ARROW ↓, RIGHT ARROW →, and LEFT ARROW ←. When the desired form is highlighted, press the SPACEBAR to select that form for printing.
Using Classic
When using Classic Print Mode, forms are selected using the spacebar method. The number of copies to print per form can be set from Classic Print Mode without setting them in Pricing or Printer Sets Setup.
To select Basic Mode, click the Basic toolbar menu item. Basic print mode, of the Basic view, provides a number in parenthesis to the left of each form name. This number represents the number of copies that print each time that particular form, for that particular return, is selected for printing.
To change the number of copies for a particular form, use UP ARROW ↑, DOWN ARROW ↓, RIGHT ARROW →, and LEFT ARROW ← to navigate to the desired form. Use the plus sign [+] and hyphen [–] to adjust the number of copies to be printed.
Printing Sets
Printing the tax return in pre-defined sets eliminates repetitious print selections. To be effective, the sets should be defined in Sets Setup before using the Sets button on the "Print Mode" dialog.
Note:
When printing sets, it is not necessary to select the specific forms to print for each return. Click Sets, and the forms that are specified in the Sets Setup are printed automatically.
After the appropriate selections have been made, click Print. Either the "Print" dialog opens, or the forms are sent directly to the printer, depending on the print request. For more information on the "Print" dialog, see Printer Setup.
The "Print Mode" dialog box contains a toolbar with the following buttons:
- View Mode – This button switches to view mode where tax forms can be reviewed before they are printed.
- DE (Data Entry) – This button returns to the Data Entry Menu for the current return. Pressing CTRL+E also returns to Data Entry Menu.
- Setup
- F9–Prop – This button displays the "Properties" dialog. The properties of the currently selected form can be edited from the "Properties" dialog. Pressing F9 also displays the "Properties" dialog. For more information, see Editing Form Properties.
- Color Configuration (Cfg) – This button displays the "View/Print Mode Setup Colors" dialog. The "View/Print Mode Setup Colors" dialog box allows customization of the forms' display colors. For more information, see Print Screen Color Configuration.
- Archive – This button provides access to archive and restore features, see Archive Manager for more information.
- Drake Documents – This button opens Drake Documents. Drake Documents offers an electronic filing cabinet based system that provides inexpensive storage and instant document retrieval.
- Archive Client Return – Select this option to archive the client return.
- Archive Manager – Select this option to access the archived data for the client.
- Help – This button opens help text related to the subject.
Note:
The View/Print Mode toolbar items may vary by return type and existence of K1 Exports, 8615 Exports, and PDF Attachments.
- Print – This button offers the option to Print the Selected Form(s) or Print to PDF. Both options open the "Print Selection" dialog. The Print to PDF selection defaults to Drake PDF Printer, but you are able to select any installed PDF or document writer printer.
- Sets – This option opens the "Print Sets" dialog allowing updates to: EF Signature, Estimate/Extensions, Client, Preparers, Federal, and K1 sets.
- Classic – This option turns classic print mode on or off.
- F2 – Select all, federal, or state forms.
- K1 Export – This button offers a process for viewing and exporting client SSN information from a business return into the partners’ individual return. This is a three-part process: 1) View and print a list of the SSNs that cannot be exported (do not exist in your client database), 2) provide a list of SSNs that can be exported, and 3) provide print and export selections as needed. The toolbar is only present when the K1 condition is met.
- 8615 Export – This button offers a process to export parent information to any child returns. The toolbar is only present when the 8615 condition is met.
- Attach PDF – This button attaches state-required forms to an e-filed return. The toolbar is only present when the required attachment condition is met.
- Enhanced – This button changes your viewing preference to an enhanced and modernized version of the print/view options. The Enhanced view combines both viewing and printing options in one location, provides tabbed groupings of all forms and categories of forms, and provides a tree view of available forms.
- Email – This action uses an external email software, or the internal Drake Email to send client emails from within the basic print mode. For individual return types, the email process uses the information entered on screen 1. You can manually type in any email address needed. Use the semi-colon to separate email address in the To, CC, and Bcc fields. Click the toolbar icon to initiate the default email software, or the available drop list to override the default settings for this one time only and change email Setup.
- Email Client – this setting overrides the default email software selection and sends this email using an external (Outlook, Outlook Express, Windows Mail, etc.) software.
- Email to Drake Support – this selection initiates the Drake Email software regardless of default email software, and allow use of the Drake Email Address Books.
- Email Client (using Drake Email) – this setting overrides the default email software selection and sends this email using the internal Drake Email software.
- Email Setup – choose this selection to open the "Email Setup" dialog to change the View/Print Email configuration settings.
- Select Email Method – Choose from the internal or external email software available. If you select "Use My Email Software," you need to ensure that you have completed the setup needed for this program outside of Drake Software.
- Email Description – gives a brief summary of the selected email method.
- To... – "allows entry of the email address(es) for the main recipient(s)."
- Cc... – allows entry for a consistent carbon copy email address.
- Bcc... – allows entry of a consistent blind carbon copy email address.
- Subject – The shipped default is [current year] Tax Return Information this can be changed. Note that changing this text within the setup changes it for all future email sent from within View/Print Email.
- Body of the email is shipped with default text. This can be changed, but any changes affect all future email sent from View/Print Email.
- Exit – This button closes the "View Mode" dialog and returns you to the main screen.
Note:
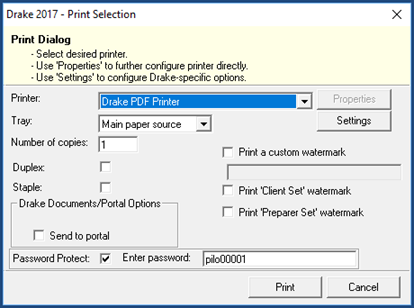
• You can password protect the PDF print file during its creation. This is only possible when using the Drake PDF Printer. There is a check box to Password Protect on both the regular Print and the Print Sets dialogs.
• By default the password is the first 4 letters of the taxpayer's last name and last 5 digits of the SSN/EIN.
Note:
To change the order of the forms in View Mode, see Sort Form Order.
Using Enhanced Viewing Preference
To view forms follow the steps below:
- Select File > View. The "EF Selector" dialog opens.
- Select return(s) to view and click View. The "View/Print Tax Return" dialog opens.
- Click on any tab.
- The selected tab’s tree format is presented in the left-hand panel. The default settings for each tab set focus to the first form in the list. This is also the form in the viewing panel.
- Navigate the tree and select forms for viewing by:
- Pressing the UP ARROW ↑ and DOWN ARROW ↓ moves up and down through the forms.
- Using the LEFT ARROW ← and RIGHT ARROW → expands and collapses the categories.
- Clicking on a form’s description.
- Continue to view forms as needed. As you view forms, click the corresponding check box to mark it for printing. Use CTRL+Q to quick print the form in the current view.
To view and print sets, follow the steps below:
- Within the "View/Print Tax Return" dialog click the Sets tab.
- Select the branch and sub-items needed. Click on the branch (upper level) item to select all sub-items under it. You can have a mixed selection of sub-items (some selected and some unselected) in the tree view.
- Click Print, the "Print Sets" dialog opens with the selected set(s) showing a check-mark in Print This Set. If needed, you can change the printer for the set(s). When the selected printer is Drake PDF Printer, you can assign a password.
- Click Print to print the set(s) selected.
- Data Entry – This button returns to Data Entry for the current return.
- Print – opens the "Print" dialog. The print action assumes Print Selected Form(s).
- Print Selected Form(s) – This option prints all the selected forms (check marked) on the selected tab.
- Print Selected Forms(s) to PDF – This option opens the "Print" dialog with Drake PDF Printer selected. If you keep the Drake PDF Printer as your PDF printer, you are able to Password Protect the PDF file. To do this, simply select the check box to enable this feature. The tax software defaults the last five of the taxpayer's SSN/EIN as the password. This can be changed, but it is important to note that the password should be something that both the preparer and the taxpayer can remember.
- Quick Print – This feature prints the form currently in the view, no other selected forms print using this feature.
- Setup – This item displays options for View/Print configurations.
- Form Properties – This option displays and allows changes to the currently selected form. For more information review Editing Form Properties.
- Form Colors – This option opens the "View Mode Color Selection" dialog, that allows color changes for the form border, background, and text.
- Form Order – This option opens the "Sort Form Order" dialog, which allows drag and drop placement of forms by return type. For more information, review Sort Form Order.
- Allow Drag/Drop Form Ordering – Select this option to enable drag and drop actions to set a new form order.
- Drake Documents – Select this option to open and update Drake Documents Integration Options.
- Pricing – This option opens the "Pricing Setup" dialog, which allows customized pricing per form or per item. For more information, see Pricing Setup.
- Printing – This option opens the "Printer Setup" dialog, which provides a way to set up printers for use with the tax application. For more information, see Printer Setup.
- Sets – This option opens the "Copies Per Set" dialog, which provides a way to establish how many copies of each form print in each different set. For more information, see Printer Sets Setup.
- Archive – This button provides access to archive and restore features. For more information, see Archive Manager.
- Drake Documents – Select this option to open Drake Documents.
- Archive Client Return – Select this option to archive the client return.
- Archive Manager – Select this option to access the archived data for the client.
- Email – This action uses an external email software, or the internal Drake Email to send client emails from within the Enhanced View/Print mode. For Individual return types, the email process uses the information entered on screen 1. You can manually type in any email address needed. Use the semi-colon to separate email address on the To, CC, and Bcc fields. Click Email to initiate the default email software, or the available drop list to override the default settings for this one time only and change email Setup.
- Email Client – this setting overrides the default email software selection and send this email using an external (Outlook, Outlook Express, Windows Mail, etc.) software.
- Email Client (using Drake Email) – this setting overrides the default email software selection and sent this email using the internal Drake Email software.
- Email to Drake Support – this selection initiates the Drake Email software regardless of default email software, and allow use of the Drake Email Address Books.
- Email Setup – choose this selection to open the "Email Setup" dialog to change the View/Print Email configuration settings.
- Select Email Method – Choose from the internal or external email software available.
Note:
If you select Use My Email Software, make ensure you have completed the set up necessary for the program to run outside of Drake Software.
- Email Description – gives a brief summary of the selected email method.
- To...
- Cc... – allows entry for a consistent carbon copy email address.
- Bcc... – allows entry of a consistent blind carbon copy email address.
- Subject – The shipped default is [current year] Tax Return Information. This can be changed. Changing this text within the setup changes it for all future email sent from within View/Print Email.
- Body of the email is shipped with default text. This can be changed, but any changes affect all future email sent from View/Print Email.
Note:
Changing the Subject text changes it for all future email sent from within View/Print Email.
- The body of the email is shipped with default text. This can be changed.
Note:
Changing the Body text changes it for all future email sent from within View/Print Email.
- Refresh – Select this option to refresh the client’s information and update the view.
- Basic View – Select this to return your viewing preference back to the established print mode and view mode settings.
- K1 Export – This item is only visible for business returns where the K1 List is in the set up options settings.
- 8615 Export – This item is only visible when the taxpayer's return has eligible child dependents.
- Attach PDF – When the return requires an attachment in order to be e-filed, this option is displayed in the toolbar menu options. Click this button to attach the needed documentation.
- Help – Opens help text documentation.
- Exit – Exits the "View/Print Tax Return" dialog.
The tabs represent categories of information within the tax application.
Tabs provided are:
- All Forms – presents a tree view of all forms and documents created for the return
- Sets – presents the forms created for the return in the order configured in Printer Sets Setup.
- EF – presents the forms needed for e-filing and any MESSAGES and NOTES pages.
- Banking – presents the forms created for and needed by the banking institution(s).
- Federal – presents all the forms needed for the federal filing of the return.
- Worksheets – presents all worksheets created for the return.
- Miscellaneous – presents all the miscellaneous (bill, statements, summary, etc.) created for the return.
- States – each state pertinent to the return has a tab and within each of the state tabs presents the forms needed for the state filing of the return.
When a form is selected from the tree view, it is displayed in the viewing panel.