How do I update or replace a PDF file that I previously attached to a return?
Federal Return
For an attachment to a Federal return:
- Go to View.
- Click the Attach PDF button to open the EF PDF Attachments dialog box.
- Select the attachment and click Delete. This returns the selected document to an unattached status and displays an "X" next to it.
- Calculate the return.
- Return to the EF PDF Attachments dialog box.
- Select the attachment
- Click Browse and navigate to the updated document for attachment.
- When you return to the EF PDF Attachments dialog box, confirm that a checkmark is displayed next to the attachment.
- Select the attachment and click View to open it and confirm that it is the updated document.
- Recalculate the return to clear the EF Message.
State Return:
State return attachments that are software attachments (required as a result of data entry in the return) are either:
- Automatic, where the attachment was generated by the software and attached when you clicked the Attach PDF button in View.
- Manual, where you printed the attachment and manually attached it on the EF PDF Attachments dialog box after clicking the Attach PDF button in View.
Automatic
- Calculate the return.
- Go to View.
- Click the Attach PDF button.
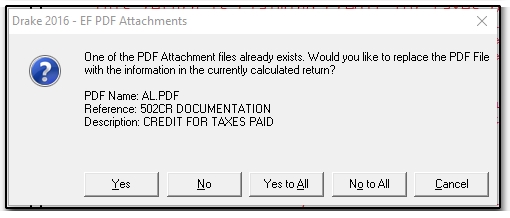
- You are prompted to update an attachment.
- Select Yes to update it (No cycles you through all automatic attachments if there is more than one).
Manual
- Calculate the return.
- Go to View.
- Select the attachment you want to update from the list.
- Click Delete to remove it.
- The attachment now displays an "X" indicating the attachment has not been completed.
- Re-calculate the return.
- Print the updated document to PDF that you want to attach and follow the normal process to attach it.
- After updating a state attachment, click View on the EF PDF Attachments dialog box to open the attachment and confirm that it is the updated document.
- Recalculate to clear the EF Message.
On a scale of 1-5, please rate the helpfulness of this article
Optionally provide private feedback to help us improve this article...
Thank you for your feedback!