How do I set up a client to use Drake Portals?
There are several ways to set up a Drake Portals (previously SFP) account for a client or taxpayer:
For a demonstration of how to set up clients in a batch, watch the video. This process is done via the Drake Documents integration > Settings > Clients tab > New Client(s). This feature allows you to run a report and create clients from the Drake Tax information. Be sure to verify the email address of each taxpayer before performing this batch process. A report will display showing the outcome for each client in the batch listing. You can correct any failed creations.
An existing client can reset their own password by using the Forgot Username/Password link on their portal login page.
You can initiate a password reset from the Drake Portals website by locating the client in the list, clicking the  menu on the right, and choosing Activation Email. This will send an email to the address on file with a link. Once they click the link it will prompt them to set up a new password for their portal account.
In the Drake Tax Integration, you can reset a password by going to Drake Documents > Setup > SFP Settings > Clients tab > select client > Reset.
Link a Drake Documents Client Folder with a Current Drake Portals Account
- Check if the client is already linked:
- In Drake Documents, select the Drake Tax client from the list on the left:
- If the SFP pane displays the Files, Connect, Messenger, and Signature tabs, the client is already linked, and you are ready to connect with your client.
- If the SFP pane displays the Search and Create buttons, then the client is not yet linked.
- If the client is not yet linked, link them:
- In Drake Documents, select the Drake Tax client from the list on the left.

- Click the Search button.*
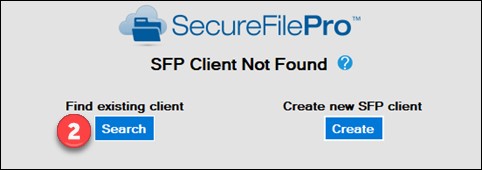
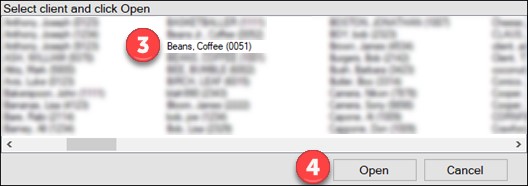
- Choose the client from the list of Drake Portals accounts.
- Click Open.
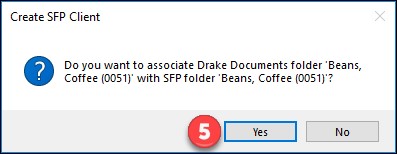
- Confirm the linking of the client on the pop-up dialog box by clicking Yes.
-
Send a Drake Portals invitation email:
- Click on the Connect tab.
- Click the Upload button to upload demographic information.
OR
- If Drake Portals will only be used to transfer files and sign documents, you can simply upload a file to the client and the invitation email will be sent.
Create a Drake Portals Account for a Current Drake Tax Client
- Open the client’s return in Drake Tax.
- Click the Documents button on the top of the Data Entry screen.
- After Drake Documents opens, click the Create button in the Drake Portals pane.
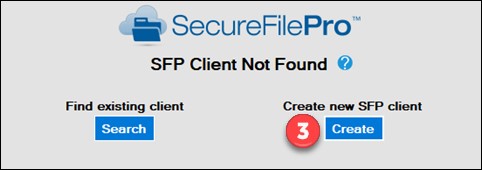
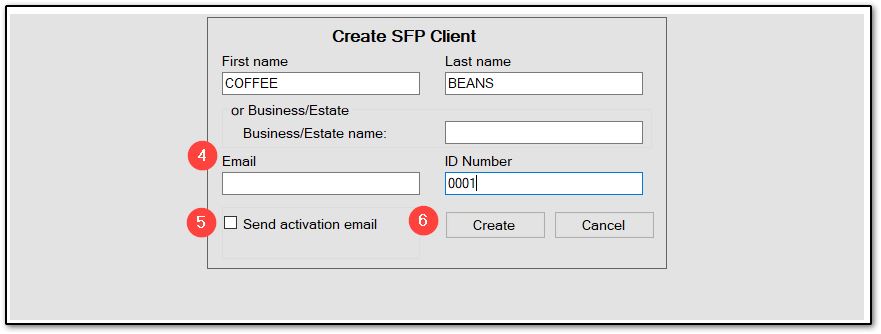
- Enter the client’s email address.
- Check the Send activation email box.
- Click Create.
Note: When the client follows the link in the invitation email, they’ll be able to establish their own password.
Drake Software recommends that the client bookmark the URL for easy access, or downloads the app for use on their mobile device. For more information about the app, see KB 17923.
Batch Setup
You can create clients in a batch based on reports run from Drake Tax data. This process is done via the Drake Documents Drake Portals Integration.
- Open Drake Documents and go to Settings > Clients tab > New Client(s) button. This will load the client creation window.
- Choose Create under the Create Batch Drake Portals Clients section at the bottom of the window. The Report Manager window opens.
- Select the relevant report such as Client List (All Clients). Apply any filters as needed.
- Be sure to verify the email address of each taxpayer before performing this batch process.
- The Client Create List window opens. Check or un-check names to limit account creation. Select any additional options if needed.
- Note: Clients with an existing Drake Portals account will be updated, not duplicated, so all can be chosen, if desired.
- Click Create. The progress is shown on the window.
- A report will display showing the outcome for each client in the batch listing under the Status Result column:

- You can correct data entry for any failed clients and then either re-run the batch creation process or create those clients individually (steps above).
For a demonstration of how to set up clients in a batch, watch the video.
Set up a Drake Portals Account for a New Drake Tax Client
To set up a Drake Portals Account, the client must be available in Drake Documents.
If the client is not showing in Drake Documents, create the client as follows depending on which cabinet of Drake Documents is used.
- If you use the Working Cabinet, you must first create a return for the client in Drake Tax.
- Go to Open/Create and type in the SSN/EIN.
- Enter their basic demographic information on Federal screen 1.
- Click the Documents button on the top of the Data Entry screen.
- When Drake Documents opens, the client will appear in the list.
- Click Create.
- Enter the client’s email address.
- Check the Send activation email box.
- Click Create.
- If you use the Archive Cabinet, you can add the client and the Drake Portals account without leaving the Document Manager. This does not create the return in Drake Tax.
- Click Add Client at the top of the window.
- Complete the First name and Last name or Business/Estate fields along with the ID Number.
- Check the box Create Drake Portals Client.
- Click Create.
Note: When the client follows the link in the invitation email, they’ll be able to establish their own password.
Drake Software recommends that the client bookmark the URL for easy access, or downloads the app for use on their mobile device. For more information about the app, see KB 17923.
*If you accidentally select the wrong client from the list, click the Change button to choose the correct Drake Portals client to associate with the client in Drake Documents.

Set up the taxpayer's account from your Drake Portals website
- From Home window, expand the Clients section and click Add New.

- A blank New Client screen opens. Complete all required items (noted by an asterisk*). Note the option to Send Activation Email to the new client.
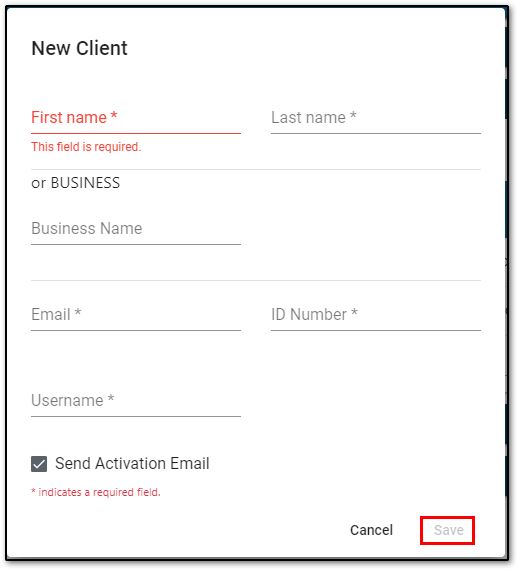
- Click Save to save the client.
On a scale of 1-5, please rate the helpfulness of this article
Optionally provide private feedback to help us improve this article...
Thank you for your feedback!