How do I create or edit reports from within the Report Manager?
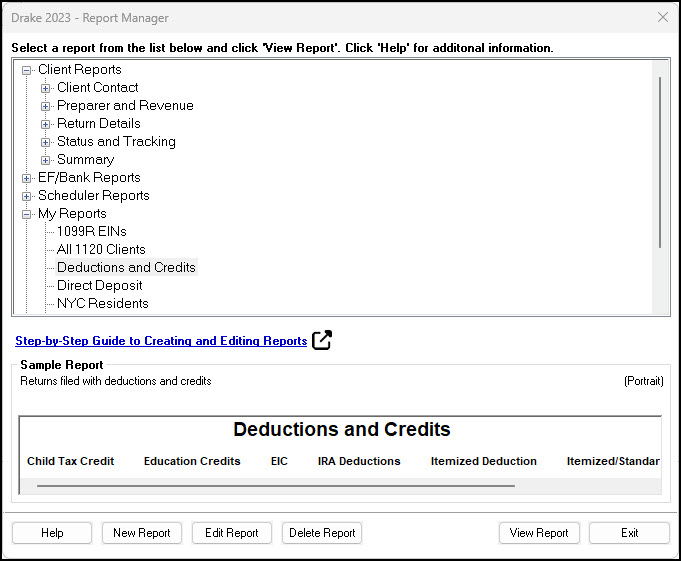
The Report Manager window allows you to create a new report or edit an existing report. You can also modify the report layout and define filters.To access the Report Manager, from the Drake Tax Home menu bar, select Reports > Report Manager.

Creating a New Report
To build a new report:
- From the Report Manager window, click New Report.
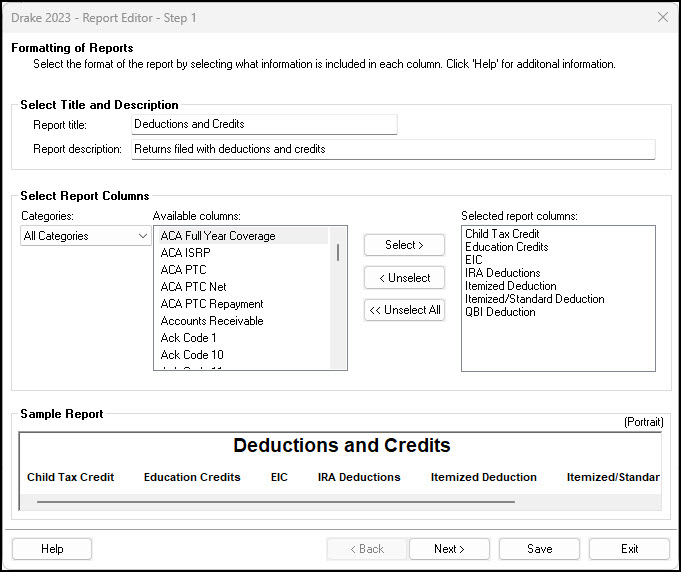
- Choose a report type: E-Filing and banking, Tax return data, or Scheduler. Click OK to open the Report Editor - Step 1 window.

- Add a Report title and Report description.
- Use the Select Report Columns section to choose the data to include in the report. The Categories drop list determines what data you can select from the Available columns list. Your Selected report columns determine what information is produced on the report; no more than 25 columns can be added. See "Reports - Report Editor" in Related Links below for additional details on using the Select Report Columns section.
- Click Save. The Report Editor is closed, and your new report is saved under My Reports.
Editing an Existing Report
To edit a report you created earlier or one of the standard reports included with Drake Tax:
- From the Report Manager, click the report to be edited from the list of standard or custom reports. The selected report is highlighted and a Sample Report is displayed at the bottom of the screen.
- Click Edit Report.
- Modify the Report Editor information as needed. See "Reports - Report Editor" in Related Links below for more details.
- Click Save. The modified report is saved (as a customized report) in My Reports. This ensures standard reports remain intact for future use.
Note: If the Edit Report button is disabled and there is not a Report Sample displayed, the selected report is protected and cannot be edited.
Deleting an Existing Report
Warning: There is no way to restore a deleted report.
Note: You can delete only reports that you create. Standard (default) Drake Tax reports cannot be deleted.
To delete a report you created:
- From the Report Manager window, click the desired report under My Reports.
- Click Delete.
- Click Yes to confirm the deletion or No to leave the report and close the dialog box.
Viewing a Report
To view any report within the Report Manager:
- Select the desired report and click View Report.
- Filter Basic Search Conditions as needed and click Continue. The results are displayed within the Report Viewer.
Notes:
- If the Edit Report button on the Report Manager is disabled and no Report Sample is displayed, the selected report is protected and cannot be edited.
- If affected data has been changed since the report was previously created, the following message is produced.

From the Report Viewer, you can take the following actions:
- Print - Send the displayed report to the default printer (including PDF).
- Export - Export the report as an Excel (.xls), comma-separated values (.csv), or text (.txt) file (see below for details).
- First - Return to the first page in the report.
- Next - View the next page in the report.
- Previous - Return to the previous page in the report.
- Last - View the last page in the report.
- Font - Adjust the text size of the report.
- Exit - Close the Report Viewer.
If an applicable client file is password-protected, the client does not show up in reports or labels.
To display data from protected returns on the returns to which they apply, starting in Drake19, go to Setup > Options > Administrative Options tab, and select Include password protected returns in reports (Admin Only).
For more information on reports, see Related Links below.
Exporting a Report
To export an existing report:
- From the Report Manager, select the desired report, and click View Report.
- Filter Basic Search Conditions as needed and click Continue. The results are displayed within the Report Viewer.
- Click Export to export the report to Excel (.xls file). Click the arrow beside the Export icon for additional export options (text (.txt) and comma-separated values (.csv) files).

Notes:
- Depreciation List and Fixed Asset Manager reports (located below Other Report Options) can be exported only as .csv files. Use the Print option to print the reports as physical documents, PDF documents, or other applicable files (dependent on your installed programs).
- If you are using Hosting on Rightworks, you must have Microsoft Office in the hosting environment to export and open .xls files. You can also choose to Export and save the report to your I:\ and then open the file from your computer. See Related Links below for an overview of how to copy a file from Rightworks to your local machine.
On a scale of 1-5, please rate the helpfulness of this article
Optionally provide private feedback to help us improve this article...
Thank you for your feedback!