Drake Pay: How do I use Drake Pay in Drake Tax?
Drake Pay is fully integrated with Drake Tax so that you can accept payments from your clients (taxpayers) quickly and easily.
The video Drake Pay demonstrates how to apply for and use this new solution. Also see Drake Pay Transactions (with a POS Device) and Drake Pay Transactions (Without POS device).
Initial Setup
Once you have been approved for Drake Pay, import your account information by completing the following steps:
- Go to Setup > Firms.
- Edit Firm number 1 and click Confirm beside your EFIN.
- Once the confirmation displays, click Save.
Point of Sale (POS) Device (optional)
The Data Cap DC DirectTM devices are compatible with Drake Pay. For more information about purchasing a compatible device, see KB 18413.
To set up your POS device:
- From the Drake Tax Home window, go to Setup > Printing and Device Setup > Drake Pay.
- Enter a Name for the device.
- Enter the device’s Serial Number.
- Click Add. The device is added to the Device List.
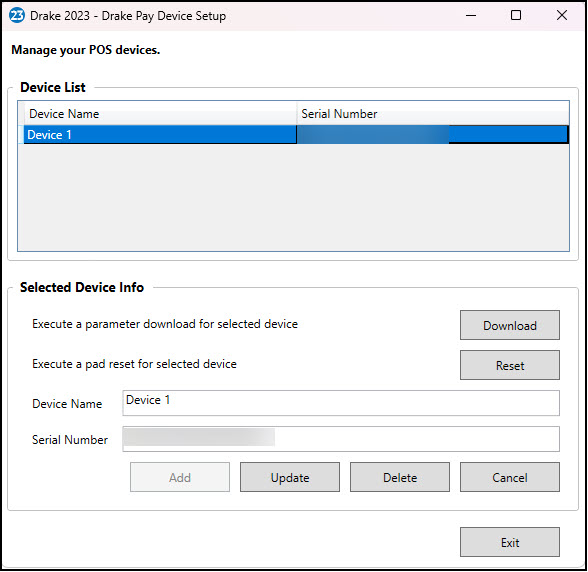
- Exit the window once all devices have been configured.
Notes:
- The option Execute a parameter download for selected device will update your selected POS device with the latest Drake Pay settings.
- If your POS device is not functioning properly, click Reset beside the Execute a pad reset for selected device.
- To make changes to or delete a POS device, select the device from the Device List, and either edit details as needed and Update the device, or Delete the device completely.
- These devices do not have to be physically connected to the computer, but must be connected to the Internet to transmit payments.
- If you want to limit who can access POS configurations, remove the option for Drake Pay from the group security for a set of preparers (Setup > Preparer(s) > Security > Edit Group Security Settings > Setup tab > Printing and Device Setup > Drake Pay).
Processing Payments from Data Entry
Setup or enter an amount due for the return preparation. If you have configured pricing for returns, this is applied automatically after you calculate the completed return. See Related Links below for information about pricing setup in Drake Tax. Then for each return, do the following:
- Review the Bill in view and make adjustments as needed by using the BILL screen. Pricing can be overridden on a return-by-return basis by using the Fee Override field on federal screen 1.
- Calculate the return to auto-fill the amount due field based on the billing/pricing setup.
- Click the Payments icon on the data entry menu.
- Payments are available for all return types.
- The Drake Pay window displays.
- Enter the Billing Information, or check the box Pre-fill with taxpayer information to pull details from data entry.
- Check Generate e-sign receipt (optional; only select if you have a signature pad).
- Manually enter payment details, or swipe the credit/debit card using a supported Point of Sale (POS) device. See KB 18413 for POS device information.
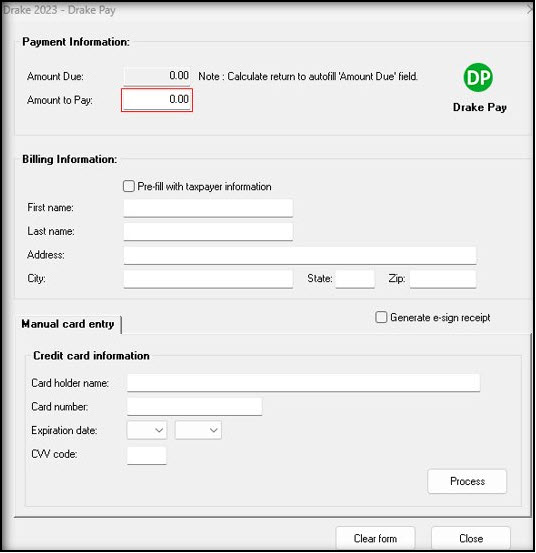
- Successful payments automatically carry to the Bill screen in the tax return.
Additional Billing/Payment Options Outside Data Entry
Payments can also be sent using Drake Portals, if the client prefers to pay remotely, and you have an active Drake Portals subscription.
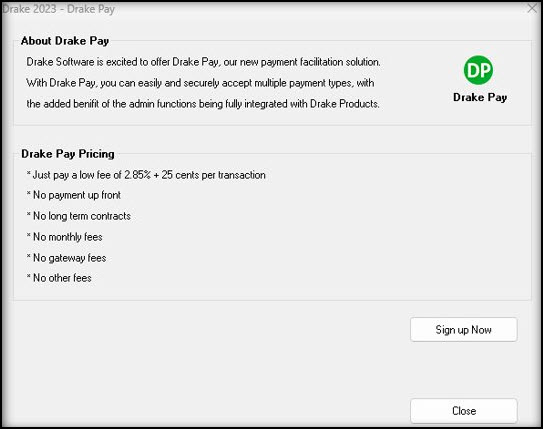
If you click on the Payments icon and see the following informational screen, verify your application status by going to the Drake Software Support website and selecting Products > Drake Pay. If the application is showing accepted, reconfirm your EFIN on Setup > Firms (above) and Save the setting to refresh the details. Then recalculate the return and attempt to process the payment again.
On a scale of 1-5, please rate the helpfulness of this article
Optionally provide private feedback to help us improve this article...
Thank you for your feedback!