Drake Pay: How do I use Drake Pay in DAS?
Beginning with Drake Accounting 2024, you can use Drake Pay to collect receivables payments from clients via credit card, debit card, or contactless payment options. For an overview of Drake Pay, or to sign up, visit the Drake Pay information page. For Drake Pay FAQs, see KB 18314.
Setting up a Point-of-Sale (POS) Device in DAS
Once you are approved to use Drake Pay, you can choose to set up and use a POS device to collect payments; otherwise, you must manually enter your client’s credit or debit card information each time you collect a payment.
Data Cap DC DirectTM devices are compatible with Drake Pay. These devices do not have to be physically connected to the computer but must be connected to the Internet to transmit payments. For more information about purchasing and registering a compatible device, see KB 18413.
If you do not have your Drake Pay device set up in Drake Tax, you must manually set up your device in Drake Accounting. If you are already set up to use Drake Pay in Drake Tax, you can simply Import your existing Drake Tax POS devices into DAS. In DAS, go to Firm > Drake Pay Setup, click Import, navigate to your desired DRAKEYY folder (such as DRAKE23 for Drake Tax 2023), and click OK.
NOTE: If you are not signed up and approved to use Drake Pay, all Drake Pay screens are replaced with an About Drake Pay screen. Drake Pay is automatically connected to your DAS program as long as the Business Identification information entered at Firm > Firm Information Setup is tied to an approved Drake Pay application.
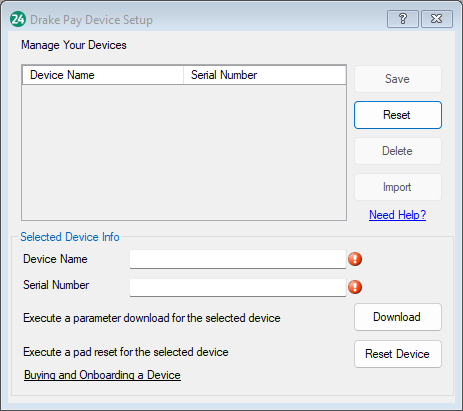
To manually set up your POS device in DAS:
- Go to Firm > Drake Pay Setup.
- Click New to add your device.
- Enter the Device Name and Serial Number.
- To update the device with the latest Drake Pay settings, click Download.
- Save your changes.
Other things to note:
- If your POS device is not functioning properly, select the device from the list, and click Reset Device.
- To make changes to or delete a POS device, select the device from the list, and either edit details as needed and Download any updates, or Delete the device completely.
- Use the Reset button to clear and reset an existing Device Name and Serial Number.
Collecting Payments in DAS
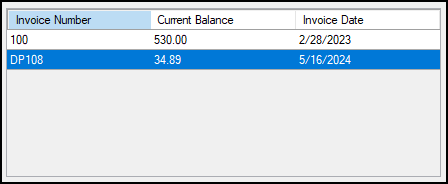
Payments processed using Drake Pay are reflected at both Receivables > Invoices and Receivables > Payments > Invoice Payments, as well as your Drake Pay Manager. (See KB 18332 for additional information on the Drake Pay Manager.) Invoice numbers created with Drake Pay begin with DP; the subsequent number matches that of the Drake Pay Manager.
There are multiple ways to collect payments in DAS. Most Drake Pay transactions share the same steps; minute differences depend on the DAS location from which you initiate the payment.
Payments can be collected using the following methods:
- For on-the-fly receivables payments if an invoice does not currently exist, use Receivables > Payments > Drake Pay.
- To collect a payment for an existing invoice, use either Receivables > Invoices or Receivables > Payments > Invoice Payments.
- To collect payments in full for multiple existing invoices from the same client, use Receivables > Payments > Batch Payments.
To complete the Drake Pay window from the applicable location:
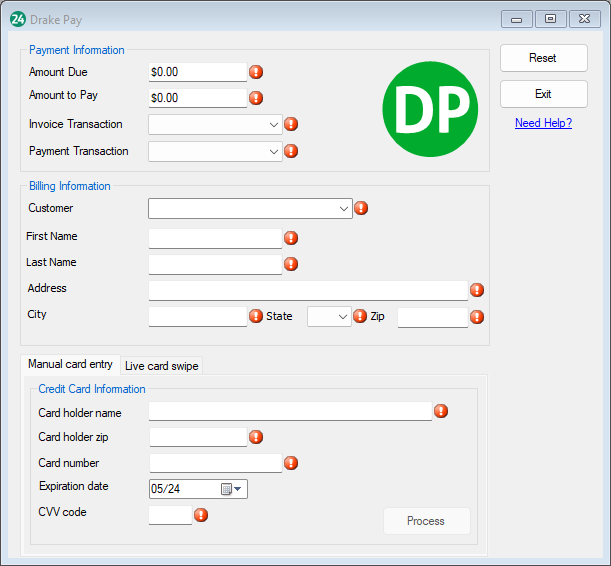
- Receivables > Payments > Drake Pay:
- Enter the total Amount Due and the current amount being paid (Amount to Pay).
- Select the applicable Invoice Transaction and Payment Transaction accounts or create a <New Account>. Account information flows from Receivables > GL Account Setup.
- Select the applicable Customer. Customer information flows from Receivables > Customer Setup and appears automatically when a Customer is selected. Override customer information as necessary.
- Choose the applicable Manual card entry or Live card swipe (POS device) tab.
- (Manual card entry) Enter the client’s payment information and click Process.
- (Live card swipe) Select the applicable Swipe device name and click Process. Follow the prompts on your POS device. You are notified when the payment is processed.
- Choose the appropriate Customer Name and Invoice Number.
- In the Payment section, click Drake Pay to open the Drake Pay window.
- Enter the customer’s First Name and Last Name. Address information flows from Receivables > Customer Setup and can be overridden if needed.
- Choose the applicable Manual card entry or Live card swipe (POS device) tab.
- (Manual card entry) Enter the client’s payment information and click Process.
- (Live card swipe) Select the applicable Swipe device name and click Process. Follow the prompts on your POS device. You are notified when the payment is processed.
- Receivables > Payments > Invoice Payments:
- Choose the appropriate Customer Name and Invoice Number.
- In the Payment section, click the sunburst icon
 to create a new transaction.
- Click Drake Pay to open the Drake Pay window.
- Enter the customer’s First Name and Last Name. Address information flows from Receivables > Customer Setup and can be overridden if needed.
- Choose the applicable Manual card entry or Live card swipe (POS device) tab.
- (Manual card entry) Enter the client’s payment information and click Process.
- (Live card swipe) Select the applicable Swipe device name and click Process. Follow the prompts on your POS device. You are notified when the payment is processed.
- Receivables > Payments > Batch Payments:
IMPORTANT: This method cannot be used to process partial payments or invoices for multiple clients. Any invoices selected during the batch process must be paid in full.
- Choose the appropriate Customer.
- Select the Invoices the client is paying in full.
- Click Drake Pay to open the Drake Pay window.
- Enter the customer’s First Name and Last Name. Address information flows from Receivables > Customer Setup and can be overridden if needed.
- Choose the applicable Manual card entry or Live card swipe (POS device) tab.
- (Manual card entry) Enter the client’s payment information and click Process.
- (Live card swipe) Select the applicable Swipe device name and click Process. Follow the prompts on your POS device. You are notified when the payment is processed.
On a scale of 1-5, please rate the helpfulness of this article
Optionally provide private feedback to help us improve this article...
Thank you for your feedback!